Wednesday, April 06, 2011

I Am Not My Body (Marius Movie and Nie Nie Dialogues)


On April 5, 2011 @ 7:00 PM, my kids, John, and some extended family members saw the movie premiere of I Am Not My Body by Mark Williams at BYU. It was an incredible documentary about a young Romanian boy name Marius Dasianu.  


During the winter of 2007, nine year old Marius and his parents were involved in a terrible house fire.  Sadly, his parents died in the fire, but Marius was able to escape by jumping out a window. He had 3rd and 4th degree burns on 75% of his body.   The fire burned his nose and eye lids off his face.  His fingers on both hands had infections, which lead to amputation of all ten fingers. 

While my niece Jessica Free was in Romania doing an internship via BYU, she met Marius at the hospital.  It was very easy to love him because of his spunky personality!  Jessica looked forward to cheering him up everyday while volunteering at the hospital but that did not seem enough for him.  Jessica and her friend Ashley called their parents wondering what else they could do to help him because the Romanian hospital was limited on treating severe burns and he was an orphan. 
Jessica and Ashley with Marius, 2008.


The two interns and their families worked together to make a website called  Team Marius (to receive donations) that helped them accomplish their goals of receiving medical help and a way for him to come to America.  To their surprise, Shriner's Hospital in Los Angeles California accepted Marius' case to provide free medical treatment for his burns!  In addition, Marius' older brother Ionut became his legal guardian, which made the process easier to get Marius into the United States! During their first year living in the United States, Marius and Ionut needed a translator (Teodora Racoveanu) since they couldn't speak English at all.   Teo was a great help to the doctors and my family members who took care of Marius.  She grew to love him very much!  
Ionut, Teo, Ashley, Marius, and Jessica, 2011

Marius lived with my brother in-law Dave Free's family for a year.  During that time, Marius had a couple major surgeries.
  • His two big toes were surgically removed and attached to his hands and now function as thumbs! 
  • The next surgery fixed his eye lids so that he can blink and close his eyes!  
  • Then he finally got a nose from using skin on his scalp!
He has several surgeries to follow in many years to come...  The Frees have grown to love Marius and have accepted him as part of their family. To our surprise, Ionut and Ashley fell in love and got married a year after Marius came to America. Around that same time, Ionut and Marius joined the Church of Jesus Christ of Latter Day Saints!  Since Ashley's family is now related to Marius via marriage, they believed it would be best if Ashley's parents became Marius' foster parents.  Dave and Kristin were sad to see Marius leave their care but at the same time they knew it was the right thing to do for him.  He continues to keep in touch with the Free family by visiting, calling, via Facebook, etc.  Marius still calls Kristin and Dave his Mom and Dad as well as his new foster parents.  What a lucky young man to have so many parents who love him!
Marius, 2011


Ashley, Marius, and Jessica, 2011


Our lives have been touched by knowing Marius! He has a wonderful sense of humor, beautiful smile, and never complains about his physical disfigurements!   He has been through a lot already and has never thought about giving up!  He makes the best of his life by not allowing his physical challenges get in the way of accomplishing great things!   He ran for vice president at his school and won!  He plays the tuba, enjoys karate, loves playing video games with his pads and "toe" thumbs!  He would like to be a motivational speaker when he is older.  He has a destiny to do AMAZING things in life and can inspire others to overcome grief!  We all can learn a lot of lessons from Marius!

Little Sister with Marius before the movie premiere, 2011!


My oldest daughter was happy to support Marius on her birthday!  


Here are some wonderful clips about Marius's story! KSL News,  ABC4 News, and  I Am Not My Body.


There were a few special guests at the movie premiere!  Stephanie and Christian Nielson were there to support Marius too.  They are burn victims who survived an awful air plane crash in 2008. Their bodies were left with scars and severe burns. Stephanie had 3rd degree burns on 80% of her body. I found out about Stephanie by clicking on her "I read Nie Nie" button a while ago from some body else's blog.  I've enjoyed reading her Nie Nie Dialogues.  She is a witty talented writer and mother of four adorable children.  She was in a recent Mormon Message video My New Life, Today Show did a story on her within days after her accident,   She was on Oprah, and you can view a great You Tube about them.  Stephanie is such an inspirational speaker, creative, kind, patient, brave, and beautiful woman outside and inside!  I absolutely love her taste in vintage clothing and interior decorating. My sister in-law Kristin Free introduced me to Stephanie!  I was thrilled to talk to Stephanie for a few minutes and got a photo taken of them with me!    


What a WONDERFUL night!  We are so blessed to know Marius, Stephanie, and Christian!  I am certain they will all achieve their goals and dreams in life because of their great examples to us on how to live life to the fullest no matter what challenges get in our paths!

Happy 12 Year Old

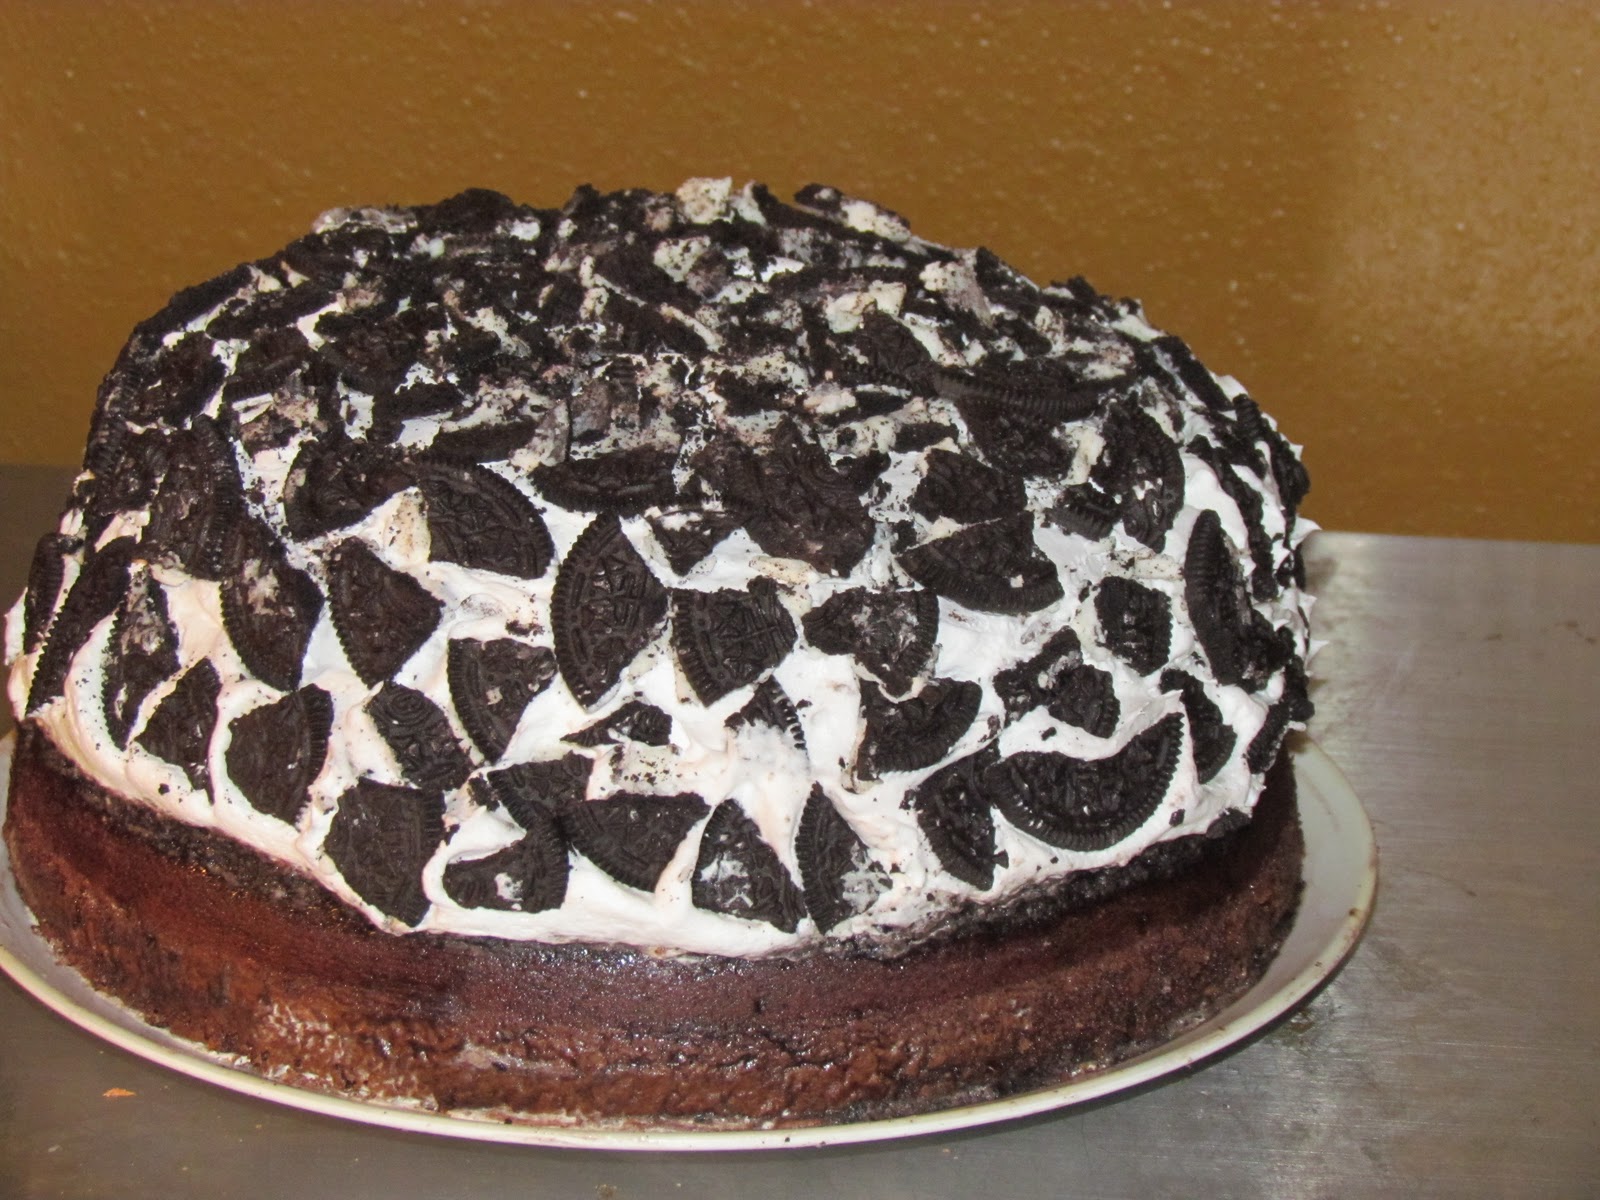
The last two days have been very busy day for me.   I made an Oreo cake, prepared for my Easter activity day lesson, worked on birthday decorations for little sissy's party, made cupcakes for the activity day girls, and went to Marius' movie documentary at BYU last night.  I will blog more later on that amazing event. 


Anyway, as for my oldest daughter's birthday, I made an adorable purse card for my pre-teen and filled it with cash for her to go on a shopping spree.  She is looking forward to spending her money at the mall and savers this weekend.  We also make her a candy bar poster!  I gave her some gummy fast food, ice cream, and some eye shadow and lip gloss.  Since she is getting older, she is getting harder to shop for these days.  She loves make-up, clothes, music, jewellery, lip gloss, etc.  I recall last year she was excited to get a Barbie doll or stuffed animal.  I'm afraid those days of wanting toys are officially over now.  I don't dare to buy her any shirts or jeans without her trying things on because she is getting very picky with the trendy teenager styles.  Grrrr!  Anyway, my brother gave her cash which is definitely a safe birthday present for her since she loves shopping!!  He is a great uncle spoiling her and knows what a pre-teen girl wants!!
Candy Bar Poster


John came up with the wording and I taped it on the poster board....It said the following:  


To our Auddie, Even though life has some SOUR PATCHES, you need to know we love you!  Be TWIX growing older and TRIDENTing to become a teenager.  We hope this year POP ROCKS for you!!!  Happy Birthday Big Sister!!! 12 oh my gosh!  No boys allowed!  7th grade here she comes!


Big Sissy had a great day!  Some of her friends at school gave her some fun birthday gifts (socks, chocolate, and soar patch kids)!


On the doorstep last night, we found a birthday surprise from the 11 year old girl next door neighbor!  Inside the gift bag contained a shirt, orange flip flops, a monkey blanket, Twix candy bar, and a card with $10.00!  Wow, she felt so much love from all the many friends, neighbors, and family members that wished her a happy birthday!  


Purse Cards


Supplies

card-stock paper, digital scrapbook supplies ( I used the Blossom collection by Shabby Princess), scissors, ribbon, foam adhesive (3D Look),  paper flower embellishments, acrylic gems hot glue gun, and glue sticks. 

Directions

Fold the paper in half.  Place the shorter width end of pattern in the middle of the paper near the folded edge. Cut out the pattern with the paper.  Place the purse flap on another piece of paper and cut around it out with the pattern.  You can trace it but my paper was to thick to trace them so I just cut around the patterns carefully.  Next put foam adhesive on the back of the flap and attach it to the bottom of the purse.  As for the flower embellishment, I folded the petals in the middle to add more character to the flower. With the glue gun, glue the acrylic gem in the middle of the flower and use foam adhesive for sticking the flower on the purse. For the purse strap, I used some ribbon which I hot glued neatly inside the folded piece of the card.  Then I tied two smaller ribbons on both sides of the straps on the bottom near the purse.


Since my oldest daughter absolutely loves Oreo ice cream, I thought it would be fun to make her a double layered Oreo cake. I was inspired by Shabby Blog's Oreo Cake recipe but I did an easier method. It was delicious!


Oreo Cake


Ingredients:


One devil's Food Cake Cake Mix (18 oz) with pudding (follow directions on box)
Two 8" baking pans (grease with shortening and dust with flour)


Bake at 350 degrees for 33 minutes.  Use a knife around the edges of pan to loosen the cake.  Remove the cake carefully onto a cooling rack.  Allow the cake to cool completely before adding frosting. 


Frosting:


1 package of Oreo cookies (20 cookies) smashed
1 cool whip container


Happy 12th Birthday, Big Sister!


Make a wish, sweetheart and may all your dreams come true!


We love you and cannot imagine our lives without you! XOXOXOX

Monday, April 04, 2011

Book Report and School Play


During the month of March, Little Sis was one busy little girl!  For the past several weeks, she has been working on her first big book report project and school play.  At the beginning of March, all the second graders were assigned to pick their favorite animal.  The first week of April she will being sharing her book report to her classmates. John took Sissy to the public library.  She narrowed down her choices to parrots, monkeys, chameleons, and elephants.  After reading books about those animals, she decided to do her book report on elephants because she has two plastic elephant toys, which will be handy for the book report display.  She checked out two books about elephants.  She has been slowly researching and answering questions like the following:


Where do they live? They are found in rainforests and deserts.
How long do they live?  Elephants can live up to 60 years, wow! They lose their teeth before they die.
How big do they get? They can grow up to be 10 feet tall!
What is an usual elephant family? It consists mothers, daughters, sisters, and babies.
What do they eat? They love grass, bushes, and leaves.
Do they know how to swim? Yes, they love to swim and can swim in the ocean.
What is the difference between African and Indian elephants?
African- Their back dips, have large ears, curved forehead, have two long tusks, and deep ridges on their trunks.
Indian- They have a rounded back, smaller ears, domed forehead, shorter tusks, and smoother trunks.


We, as a family, helped her put together a diorama (a shoe box display).  She drew some clouds, cut out leaves, and glued on some pieces.  She and Daddy decided to make a grassland, pond, and desert out of colored contraction paper to represent where they are found.  John also made a tree trunk. Big Sister and I helped her make a sun, flowers, grass, lily pads, and water lilies.  Sister placed the elephants in the box. We tried to accomplish a 3D effect by bending some pieces to stick up and using foam (raising height on a flat surface)!  On the back of the shoe books, there is information about her animal, which she will share with her class.  We are very happy with the end result.  She cannot wait to share it with her teacher and classmates.


As for the Glow play, her second grade class did an incredibly cute job!  The play was about birds, bugs, flowers, and insects.  They talked about each insect, bird, etc wonderful qualities.  Little Sister was a dancing butterfly.  They sang a lot of fun songs too.  I loved all the props and costumes!  It was such a darling play! 


They sang a couple songs with flowers.


Sissy with her best friend.  


My dancing butterfly!


She wore an orange flower too!


During one of the songs, they got to shine a small flash light!  


The beautiful dancing butterflies (Sissy is on the right with orange wings).


Overall, it was a great busy month for her.  Now she is looking forward to her 8th birthday party in a couple weeks and being baptised a member of  the Church of Jesus Christ of Latter Day Saints on May 7, 2011. Go Sister!  Yay!


Monday, March 28, 2011

2011 Goal Check List

My to do list and what I have accomplished so far this year:


Get Organized:

  • Finish typing or copy/pasting recipes.
    • Print out and organize recipe pages into my binder.
  • De-clutter my house!
    • Go through clothes, toys, games, old beddings, videos, DVD's, books, electronics, etc.
    • Donate things to DI.
    • Organize craft supplies.
    •  Get new beddings, sheets, pillow cases, pillows, etc for kids and us.
  • Organize my activity day leader book.
    • Update their goals, which they have passed off recently.
    • Add incoming girls and their birthdays to my book.
    • Plan four months worth of activity day ideas.
    • Type and print out a calendar of the next few months of activities.
  • Plan and prepare for my youngest daughter's 8th birthday party!
    • Do a very cheap butterfly theme.
    • Make home-made birthday invitations.
    • Buy a cheap flower or butterfly piñata and buy candy at dollar store.
    • Make flowers and butterflies garland.
    • Make a Happy Birthday banner.
    • Make butterfly cupcakes.
    • Make the game pieces for stick the spot on a butterfly.
    • Make a CD for musical chairs game.
    • Use leftover butterfly party supplies from oldest daughter.
    • Collect recyclables (toilet paper rolls and egg cartonsand buy missing craft supplies for butterfly and caterpillar crafts.
    • Make the toilet roll butterfly and caterpillar crafts as decoration and examples for the birthday party.
    • Make caterpillar hair-clips.

Spiritual Goals:

  • Improve on personal prayers and scripture study!
  • Improve on church attendance and tithing/fast offerings.
  • Have Family Home Evening every week.
  • Go to temple with Husband.
  • Write in gratitude journal.
  • Read conference talks from the Ensign.
  • Go to Enrichment night! (Yay, I went to the Relief Society Birthday Dinner)!
  • Family prayers and scripture study.

Health and Fitness:

  • Work out 5 times a week mixing up the workout routine (weights, running, Turbo Jam (kick-boxing), P90X, etc.  The more different activities that I do, more than likely it will confuse my body to lose weight.
  • Slowly purge sugar out of my diet!  Try eating South Beach Diet for a couple weeks to notice any changes in metabolism.
  • Get a six month recreation pass to the gym.  Use the elliptical, treadmill, stationary bike, weights, and take a zumba class.
  • Make a new iTunes workout mixture of up beat music for my iPod nano.

Meal Plans:


Educational Goals:

  • Apply to Salt Lake Community College.
  • Apply for financial aid.
  • Obtain College transcripts and hand deliver them to SLCC.
  • Do new student orientation and meet with an advisor.
  • Apply to nursing program May 12-25, 2011.
  • Register for classes in the fall 2011.  Sign up for the following classes: nutrition, math 1025 pharmacology, a fun fitness class, and some time in the future pathophysiology (as soon as I find out when I will start my nursing program).
Look for a job in health care:

  • Get food handler's permit
  • Get CPR certified
  • Apply for jobs on crag's list,newspaper classifieds, Job Workforce Services, etc.
Reading:
Scrapping:
  • Install Adobe Photoshop Elements on my new desktop computer.
    • Call Customer Service about registering the license since there was a problem.  Thankfully they allowed me to register the software on my new computer since the old desktop died.
  • Scrap 2-5 layouts per week.
Financial:
Developing Talents: 
  • Do a craft at least once a month.
  • Cut out 4"X4" wooden blocks. Come up with a design using scrapbook paper and stencil lettering our last name FREE on the blocks.
  • Do something creative for my visiting teaching sisters.
Self Reliance:
  • Strawberries will be in season soon, which means the cost of buying them should go down!  I better start learning how to make some freezer jams and strawberry sauces.

Thursday, March 17, 2011

Happy St. Patrick's Day

Today we had a lot of fun celebrating the holiday.  My husband made scrambled green eggs and ham (topped with melted cheese) for breakfast while my girls and I did nail manicures.  We painted our finger nails neon green and a green glittery clear coat on top.  
Here are my girls wearing their green lucky charms!
Later in the afternoon, I did some visiting teaching.  It was my turn to teach the lesson this month.  I gave my visiting teaching sisters a bag of gold chocolate coins and a note that said, "We are so lucky to know you!"  
The Supplies
Lucky Shamrock St. Patrick's Day Card
White and green card-stock paper
Green ribbon
small heart shaped cookie cutter
Green paint( I used green finger paint)
Chocolate gold candies in a mesh sack
Pens or markers (green and black) 
Paper hole punch
Stamp the clover using a small heart shaped cookie cutter on white card-stock paper. Allow the green paint to dry.  Cut some green ribbon out.  Cut out a square around the dry painted clover and glue on the white paper on top of green paper. Cut around the edges so that it looks straight and uniformed.  With the hold puncher, press a hole through papers and pull the ribbon through the mesh candy sack .  Add the following text with a marker: "I'm lucky to know you!"   
After school, the girls were surprised to find out that a tiny leprechaun visited our house  today.  "He" filled the toilet tanks with green food coloring.   He left some shamrock clues for a scavenger hunt. There were (lucky seven) shamrock clues and messes around the house for the girls to find. At the end of the hunt, they found some gold coins and "I am lucky to have you" paper design from The Crafting Chicks. The clues were the following:
Front Door: Warning A Leprechaun was here!  Find his clues written on shamrock near his messes he made.  Start in the living room.  Ready set Go!!!
Clue 1. Rainbow Balloon Mess: Find #2 mess in Kitchen Ha ha ha!
Clue 2.  Homework Mess: Find #3 mess in laundry room.
Clue 3.  Toilet Paper Mess: Find #4 mess in your bedroom.
Clue 4:  Laundry Mess: Find #5 in Mom and Dad's Room
Clue 5: Bed Pillow Mess:  Find #6 mess in Mom and Dad's master bathroom.
Clue 6: Nail Polish Mess:  Find #7 in a green plant in living room.
Clue 7: Hidden in Living Room Plant: Look under the bed on the side that snores to find your surprise! (Dad's side of bed).  LOL!!!
Surprise!  I'm so LUCKY to have YOU!
They were very happy to eat chocolate coins for their after school snack!
At dinner, we talked about the history of St. Patrick Day.  As for the amazing food, we decided it would be great to try a traditional Irish meal.  We got some corned beef and cabbage on sale at Smiths.  We made Slow Cooker Corned Beef and Cabbage, which I got the recipe from Family Fun.  With our bread maker, we made a garlic and herb crusty bread.  I made a simple green fruit salad.  As for our drinks, we had apple beer (non-alcoholic of course).
Rainbow Fruit Salad
Strawberries
Peaches or mandarin oranges
Bananas or pineapple
Green grapes
Blueberries
Purple grapes 
Sweetened Whipped Cream (see below for recipe)
Small Green Jello Mix
Cut up the fruit into bite size pieces and add to a medium size bowl.  Toss together the many fruits.  Beat the sweetened whipped cream mixture.  Add cream to fruit and  pour in the green lime Jello package. Gently stir together and allow the fruit salad to chill for a couple hours before serving.
As for dessert, the kids absolutely loved helping me make the rainbow cupcakes, which we got the recipe from Family Fun.  Here is the recipe:
Taste a Rainbow Cupcakes
White cake mix
Food coloring (red, blue, green, and yellow)
Baking cups
Sweetened whipping cream (for the cloud)
Rainbow sprinkles
Follow the directions on the cake package.  Divide the batter evenly among six small bowls.  Follow the chart below, dye each bowl of batter a rainbow color.   Line the muffin tin with baking cups.  Add purple, then blue, green, yellow, orange, and red evenly.  As you go, gently spread each layer of batter with the back of a spoon to cover the color underneath.  Bake the cupcakes according the cake box directions.  Before severing remove the paper wrapping, and top with whipped cream "cloud" and dash some rainbow sprinkles.
 Food Coloring Drops Chart
Purple:  9 red and 6 blue drops
Blue:  12 drops
Green:  12 drops
 Yellow: 12 drops
Orange:  12 yellow and 4 red drops
Red:  18 drops
Sweetened Whipped Cream (Our Best Bites)
1 c. Whipping Cream
1/3 c. powdered sugar
Combine whipping cream and powdered sugar in a large bowl.  With an electric hand mixer, beat whipping cream until soft peaks form.
It was a busy day! We made a lot of fun memories today! The girls especially got a kick out of the leprechaun scavenger hunt!  I hope you had a wonderful Green day!  Take Luck!!!  ~Jen

Tuesday, March 08, 2011

Simple Groovy Paper Dolls

Groovy Paper Dolls
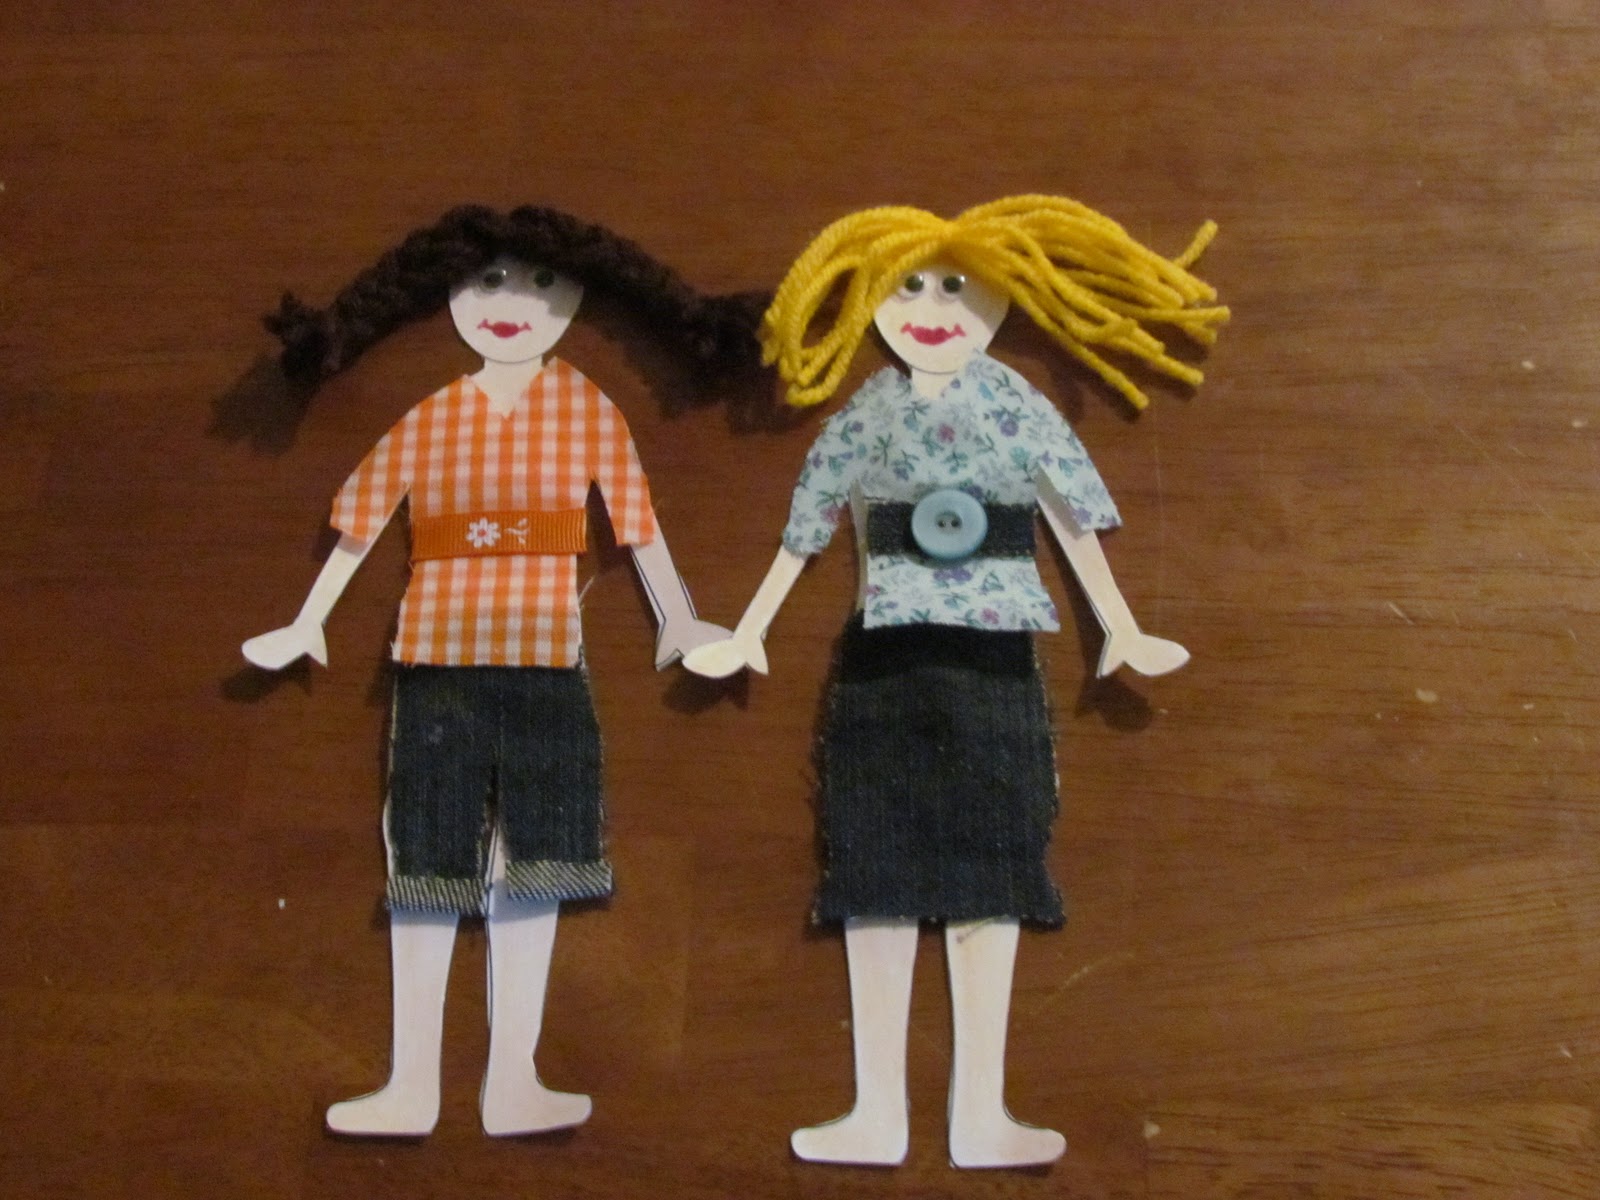
Today was Activity day.  My co-leader and I decided we should do a lesson on modesty with our 8-11 year old girls in our ward. When I was a little girl, I loved playing with paper dolls.  I recall having the paper dolls with clothes that had a tiny folded pieces that kept the clothes on the doll's body.  I decided that crafting paper dolls during our modesty lesson would be a fun activity for the girls.  For the last three days, I have been creating paper doll supplies. Material scraps, old ripped jeans, scissors, yarn, glue gun, buttons, ribbons, have been scattered all over my bedroom floor.   While visiting my in-laws this past weekend, I had the privilege of using my mother in-laws vintage scrap material to make the doll clothes.   The material is from the seventies and early eighties!  I can imagine many blankets, doll clothes, and kid's clothes were sewn using these material scraps.  They are so groovy and the girls absolutely loved them!  They were commenting on how they would wear most of the fashion designs I came up with.
Here are some of the outfits that I made using the vintage material scraps.
I made denim shorts, skirts, and  jeans out of my girl's old ripped jeans.
Paper Doll Supplies:
paper doll body found at Wendy's Activities
card-stock paper 
material, denim jeans scraps, and felt 
scissors, glue/ Velcro,
glue gun and glue sticks
yarn (yellow, red, brown, and black)
buttons and ribbons
Wiggly Eyes
crayons, pens, markers, or pencils
Instructions: Make a pattern for the dress, shirt, pants, shorts, skirt, swimsuit, etc by tracing around the paper doll's body. Pin the pattern on material and cut it out.  Add embellishments like ribbon, felt, and buttons for a belt or shirt designs.  I used the hot glue gun to apply the ribbon, buttons, extra fabric pieces, etc. I created many different hair styles, short, long, medium length, bangs or no bangs, pigtails, braids, and straight hair down. Draw lips with a red marker and color the body with crayons.  Cut out the "model" (use card stock paper).  Next, glue the wiggly eyes and hair on the face.  During my activity, I had my girls glue the clothes on the body.  At home, I applied Velcro pieces to the doll and clothes so that they could change the doll's clothes.
  
We each did two paper dolls.  Little Sister's dolls are on the left, mine are in the middle, and big Sister's dolls are on the right.  They were so much fun to make!  I think they are darling if I say so myself, LOL!
Here are some of our favorite paper doll fashions.


While the girls worked on their paper dolls, I read some information on modesty and my co-leader did an object lesson.  My co-leader got a Glamour magazine and read an article about Blessings from the Friend.  The girls were so confused looking at the cover of the magazine of a model dressed in a sleeveless sun dress and wondered how some church related material would be in the middle of Glamour magazine.  One girl said, "Did that article really come out of that magazine?"  At the end, she pulled the Friend page out of the book and explained to the girls that we need to be careful with how we choose to dress because we send the wrong message to others when we don't dress modestly.  Next, my co-leader showed the girls her vintage paper doll books from the 1940s-1950s.  We were surprised to notice that during World War II the women's fashion were very modest but after the war the skirts got shorter and the tops became too low or sleeveless.   After some of the girls were done making their paper dolls, my co-leader had them look through the Glamour magazine to try to find some modest fashion as well as pick out the indecent clothing.  They shared the results with the rest of the group by indicating the well dressed models as circled verses the not modest clothing with a large X!  I sent the girls home the modesty material that I read to them as well as a bookmark titled: Modest is Hottest that included some modesty quotes like the following: "What you wear tells others who you are."  "Dressing modestly invites the Holy Ghost. When you are well groomed and modestly dressed, you can influence others for good."  "What you wear shows your respect or disrespect for places you go and people you're with. My favorite quote is : What you put on your body 'talks' And everyone who sees you 'hears' what you're saying."  Tonight after doing homework and reading, little Sis wanted to play with the paper dolls at the dining table.  Good times are ahead for this little girl by playing with simple paper dolls!  What a wonderful activity planned and finished! Yay,  I was so happy that six girls showed up today and had a blast!  Now I can rest after all that hard work!  Whew!

Kielbasa and Shells


This recipe is basically like mac and cheese but better.


1 package of pasta (shells of any size, you can use others a well)

1 turkey kielbasa or polish (beef/pork) sausage
1 package of Swiss cheese slices
1/4 cup of butter
1/2 cup of milk


Chop the kielbasa into bite size pieces.  Boil the shells with the kielbasa (no need to add salt or oil due to having the meat boiling with the shells).  Drain the water and add the slices of Swiss cheese, milk, and butter.