Friday, April 29, 2011

Easter Weekend Highlights

We had a fun Easter Weekend!  John's parents came to visit us for the weekend.  They stayed on an air mattress in our living room.   John was able to to finish our box garden.  I will be blogging more later on that subject!

Saturday afternoon, we ate lunch at Olive Garden with G&G Free, Mike, Rachel, and Jessica Free.  My nephew Justin Silva was our waiter. We had a great time visiting with everyone as well as indulged on some amazing Italian food!  We even got to sample some delicious desserts  free of charge!  Thank you, Justin!


Granny and I enjoyed watching the mini series of North and South based on the book by Elizabeth Gaskell while the guys went to buy some raspberry plants.  The kids dyed some Easter eggs.  We absolutely loved the movie and cannot wait to get our hands on the book!  If you haven't read or seen this beautiful masterpiece please do!  We highly recommend them!


On Sunday morning, we enjoyed attending church with G&G!  I made some cinnamon rolls with a zesty lemon frosting for an afternoon treat while the girls played games with Granny and the men were taking naps. 


The winner was....  GRANDMA!   She had the most bling!


For Easter dinner, we went to Marilee's house (my sister in-law).  We had ham, cheesy potatoes, vegetables, fresh fruit, home-made rolls and salad.  It was a lovely meal and the best was dessert!  Marilee made a scrumptious strawberry shortcake!

 Strawberry Shortcake by Betty Crocker


Strawberry Shortcake

4 cups of strawberries
1/4 c. sugar
2  1/3 c. Bisquick mix
1/2 c milk
3 T. butter, melted
1/2 c. whipping cream

Preheat oven 475 degrees.  In a large bowl, mix strawberries and 1/4 c sugar, set aside.  In a medium bowl, stir Bisquick mix, milk, 3 T. of sugar and the butter until soft dough forms. On a ungreased cookie sheet drop dough by spoonfuls or in a round cake pan.  Bake for 10-12 minutes or until golden brown.  Meanwhile in a small bowl, beat whipping cream with electric mixer on high speed until soft peaks form.  Split warm shortcakes or large cake, fill and top with strawberries and whipped cream.

After dinner, my father in-law talked about the atonement and resurrection of Jesus Christ.  He always does a wonderful job in sharing his experiences and testimony!  Next, we played some games such as Do You Love Your Neighbor, Boggle, and Book of Mormon Trivia.  The kids jumped on the trampoline and played baseball in the back yard.  Some people went for a walk while others just talked with each other.  Afterwards we came home and the kids wanted G&G to see Tangled.  They absolutely loved Tangled especially the silly horse!  Overall, it was an enjoyable weekend with John's parents that went by so quickly!


Friday, April 15, 2011

Butterfly 8th Birthday Party

This year I got very creative and frugal by making my youngest daughter's birthday party invitations, Happy Birthday banner, decorations, games, crafts, cupcakes, cake, etc.  The birthday party was big sister's words "epic"! 
 
The Birthday Invitation
Credits: An Affair to Remember and the Blossom collection (butterfly) by Shabby Princess and love you like a sister font.

The Beautiful Birthday Girl
She is wearing a darling butterfly and flower dress with white leggings!

Thank you, Mindi for the pink birthday Barbie!

The Party Guests!

You gotta have a silly picture too!

The Decorations:
Butterfly and Flower Happy Birthday Banner 


Garland Strands
They were hung below cupboards and over the windows in the living room.

Supplies:
Card-stock, scrapbook supplies (I used the Blossom collection by Shabby Princess), brown twine, embellishments from scrapbook kit, acrylic gems, stencil lettering, ribbons, glue gun, glue sticks, scissors, modge podge and a paint brush.
Instructions:  Measure out 4" X 4" block squares on your patterned paper.  Use a stencil to trace the letters and cut them out. Paste the letters on a small block piece with a glue stick and then paste it on the large square.  I glued on some acrylic gems on some of the flowers and butterflies. Then, I applied modge podge on the letters, blocks, rainbows, butterflies, and flowers.  Allow them to dry.  Next, punch out two holes on each side of the paper things using the hole punch.  Push the twine through the paper pieces and tie each end making a small loop. Tie pretty ribbon between the paper!
Paper Flower Sticks
I was inspired by Kylie who posted a hybrid paper craft at Shabby Princess' Blog to make these gorgeous paper flower decorations. 
Supplies:
Card stock paper, digital scrapbook supplies, acrylic gems, green craft popsicle sticks, bamboo sticks
Instructions:
Measure four pieces of paper to size of 4"X4". For the paper flowers, fold the 4"X4" paper like you are making a paper fan.  Then fold it in half.  For the flower you need four pieces of paper you can do the same color or mix it up with other designed paper.  Use the glue gun to glue the pieces together.  Glue the acrylic gem in the middle and glue the bamboo stick to the flower.
The Party Games
We played the following games: musical chairs, cocoon toilet paper wrap,
 stick the dot on the butterfly, bug bingo, and a balloon game.
Musical Chairs
Cocoon Toilet Paper Wrap
Divide the kids into two teams.  The quickest team to unroll the toilet paper wins!
Stick the dot on the butterfly!
As you can see, it was hand drawn and colored with markers.  I traced some circles from a template for the dots!
Bug Bingo

I printed out the bug bingo game templates from Family Crafts  and hand wrote several different bugs such as the following: ant, bee,beetle, butterfly, caterpillar, centipede, cicada, cockroach, cricket, dragonfly, firefly, flea, fly, grasshopper, horsefly, ladybug, mosquito, moth, praying mantis, spider, stick bug, stink bug, termite, wasp, and worm. For the markers, we used colored torn paper. We played two rounds!
Balloon Game

Divide the kids into two teams. The kids had to pop the balloons to find letters contained inside.  The first team that successfully spelled the birthday girl's name won!
The Recycled Party Crafts


Toilet Roll Butterfly

Supplies 
Empty toilet rolls, googly eyes, card-stock paper, butterfly template, scotch tape, pipe cleaners, scissors, hot glue gun, craft glue or glue stick, hole punch, and markers.
Instructions: Wrap some card-stock paper around the toilet roll and tape the end. Cut out butterfly template.  Hot glue the butterfly wings to the toilet roll.  Rip up scrap pieces of paper and glue them on with craft glue or glue stick. Punch a hole on the top of the toilet roll and push a pipe cleaner through.  Twist the pipe cleaner and bend the antenna to your desired look. Glue googly eyes and draw a mouth with a marker.
Egg Carton Caterpillar

Supplies:
Egg carton, googly eyes, rainbow pom poms, green paint, paint brush, pipe cleaners, scissors, craft glue, hot glue gun, markers, and hole punch.
Instructions: Cut the egg carton in half using a knife or scissors.  Make sure the carton is flat and you may need to cut it down.  Paint the egg carton ( I used some metallic green to achieve the silky green look).  Use a hole punch on the sides of the four middle cartons.  Make sure you punch both sides and push through pipe cleaners for the caterpillar legs.  Glue on antenna, colored pom poms, eyes, nose and draw a mouth with a marker.
The Party Food
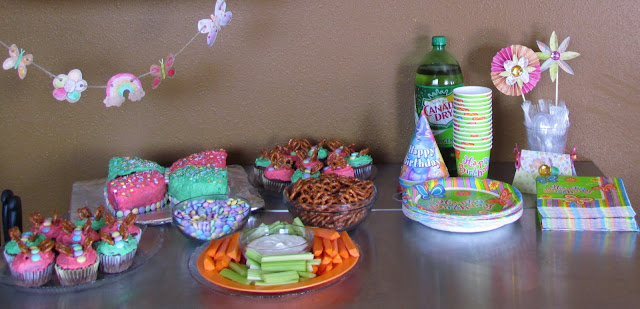
We served pizza, pretzels, pastel M&M's, celery, carrots, ranch dip, white cranberry peach with seven up, home made from scratch chocolate butterfly cupcakes, and a butterfly cake (no cake mix)!
Butterfly Cupcake idea was inspired by Martha Stewart.  
Mine didn't turn out as cute as hers but you can see that they do appear to be like butterflies!  I used pastel M&M's and pretzels for the butterfly.

The butterfly Cake
Chocolate Devil's Food Cake
1/2 c hot water
1- 1/2 tsp. soda
1/2 c. cocoa
2/3 c. butter
1 -3/4 c. sugar
2 eggs
1 tsp. vanilla
1/2 tsp. salt
3/4 c. milk with small amount of vinegar
2-1/2 c. flour
Directions:
Preheat oven to 375 degrees. Mix hot water, soda, and cocoa and set aside.  In a large bowl, cream butter and sugar with electric hand mixer then add eggs.  Next add vanilla and salt. Mix the chocolate mixture in with the rest of the ingredients.  Add milk and flour alternately a little at a time mixing well.  Bake for 30 minutes or until tooth pick is clean.
Make a Wish, Sweet Girl!
The Party Bag
I used some leftover birthday balloon bags from my oldest daughter's birthday party a couple years ago.  We ordered a couple things from the Oriental Trading a while ago before I decided to do a butterfly theme (air planes, balls, and a package of random toys) and picked up some candy from the dollar store.  My mother in-law gave me some beautiful butterfly hair clips to give to the girls, which she got from Japan while serving a mission there.  The girls absolutely loved them!
Little sister was spoiled today with a loot of fun presents from her friends!  We got her Tangled, which she watched right after the last party guest left our house!   Last weekend she got an early birthday present from my mom and Uncle Nate.  They gave me money to get her ears pierced!  She was so excited to show everyone her sparkly ears!   As for her lovely butterfly party, Little Sissy said, "This was the best birthday ever!"  Yay! I am so happy it was a successful 8th birthday party!  We are looking forward to her baptism day in a couple weeks!  

Friday, April 08, 2011

Student of the Week and Japan Report

What a fun day!!! Since next week will be little sister's birthday (my tax baby) and school is out on spring break, she was student of the week. Today John went to her classroom at 11:00 AM.  He talked about little sister's poster that I made as well as passed out Reece's mini eggs as her birthday treat. Her teacher decorated her desk with paper like a present and gave her a couple presents (colored pencils, candy necklace, some paper, a crown, and a coloring page).  This week she received a postcard from her teacher that said the following:
Dear Parents,  
I have the pleasure of letting you know that Savannah will be our student of the week.  She has shown through her great improvement in academics and wonderful behavior that she has earned this great honor.  Thank you for raising such a responible behevior.  
Love, Mrs. Litchford
 Her classmates made cute birthday cards too!  Later in the afternoon, "Big Dave" (Mrs. Litchford's husband) read little sissy's favorite book Wacky Wednesday by Dr. Seuss to the class. 


Big Sister had her country report fair.  She picked Japan as her country to research on since her Aunt Chiaki is from Tokyo and her cousin Justin served a mission in Nagoya!  I was able to see her present her tri-fold this afternoon!  She did a fantastic job and I must say Japan has a fascinating culture filled with cool traditions!  I would absolutely love to see Japan someday!  My heart aches for the people of Japan who are suffering so much after the recent natural disasters.  

Wednesday, April 06, 2011

I Am Not My Body (Marius Movie and Nie Nie Dialogues)


On April 5, 2011 @ 7:00 PM, my kids, John, and some extended family members saw the movie premiere of I Am Not My Body by Mark Williams at BYU. It was an incredible documentary about a young Romanian boy name Marius Dasianu.  


During the winter of 2007, nine year old Marius and his parents were involved in a terrible house fire.  Sadly, his parents died in the fire, but Marius was able to escape by jumping out a window. He had 3rd and 4th degree burns on 75% of his body.   The fire burned his nose and eye lids off his face.  His fingers on both hands had infections, which lead to amputation of all ten fingers. 

While my niece Jessica Free was in Romania doing an internship via BYU, she met Marius at the hospital.  It was very easy to love him because of his spunky personality!  Jessica looked forward to cheering him up everyday while volunteering at the hospital but that did not seem enough for him.  Jessica and her friend Ashley called their parents wondering what else they could do to help him because the Romanian hospital was limited on treating severe burns and he was an orphan. 
Jessica and Ashley with Marius, 2008.


The two interns and their families worked together to make a website called  Team Marius (to receive donations) that helped them accomplish their goals of receiving medical help and a way for him to come to America.  To their surprise, Shriner's Hospital in Los Angeles California accepted Marius' case to provide free medical treatment for his burns!  In addition, Marius' older brother Ionut became his legal guardian, which made the process easier to get Marius into the United States! During their first year living in the United States, Marius and Ionut needed a translator (Teodora Racoveanu) since they couldn't speak English at all.   Teo was a great help to the doctors and my family members who took care of Marius.  She grew to love him very much!  
Ionut, Teo, Ashley, Marius, and Jessica, 2011

Marius lived with my brother in-law Dave Free's family for a year.  During that time, Marius had a couple major surgeries.
  • His two big toes were surgically removed and attached to his hands and now function as thumbs! 
  • The next surgery fixed his eye lids so that he can blink and close his eyes!  
  • Then he finally got a nose from using skin on his scalp!
He has several surgeries to follow in many years to come...  The Frees have grown to love Marius and have accepted him as part of their family. To our surprise, Ionut and Ashley fell in love and got married a year after Marius came to America. Around that same time, Ionut and Marius joined the Church of Jesus Christ of Latter Day Saints!  Since Ashley's family is now related to Marius via marriage, they believed it would be best if Ashley's parents became Marius' foster parents.  Dave and Kristin were sad to see Marius leave their care but at the same time they knew it was the right thing to do for him.  He continues to keep in touch with the Free family by visiting, calling, via Facebook, etc.  Marius still calls Kristin and Dave his Mom and Dad as well as his new foster parents.  What a lucky young man to have so many parents who love him!
Marius, 2011


Ashley, Marius, and Jessica, 2011


Our lives have been touched by knowing Marius! He has a wonderful sense of humor, beautiful smile, and never complains about his physical disfigurements!   He has been through a lot already and has never thought about giving up!  He makes the best of his life by not allowing his physical challenges get in the way of accomplishing great things!   He ran for vice president at his school and won!  He plays the tuba, enjoys karate, loves playing video games with his pads and "toe" thumbs!  He would like to be a motivational speaker when he is older.  He has a destiny to do AMAZING things in life and can inspire others to overcome grief!  We all can learn a lot of lessons from Marius!

Little Sister with Marius before the movie premiere, 2011!


My oldest daughter was happy to support Marius on her birthday!  


Here are some wonderful clips about Marius's story! KSL News,  ABC4 News, and  I Am Not My Body.


There were a few special guests at the movie premiere!  Stephanie and Christian Nielson were there to support Marius too.  They are burn victims who survived an awful air plane crash in 2008. Their bodies were left with scars and severe burns. Stephanie had 3rd degree burns on 80% of her body. I found out about Stephanie by clicking on her "I read Nie Nie" button a while ago from some body else's blog.  I've enjoyed reading her Nie Nie Dialogues.  She is a witty talented writer and mother of four adorable children.  She was in a recent Mormon Message video My New Life, Today Show did a story on her within days after her accident,   She was on Oprah, and you can view a great You Tube about them.  Stephanie is such an inspirational speaker, creative, kind, patient, brave, and beautiful woman outside and inside!  I absolutely love her taste in vintage clothing and interior decorating. My sister in-law Kristin Free introduced me to Stephanie!  I was thrilled to talk to Stephanie for a few minutes and got a photo taken of them with me!    


What a WONDERFUL night!  We are so blessed to know Marius, Stephanie, and Christian!  I am certain they will all achieve their goals and dreams in life because of their great examples to us on how to live life to the fullest no matter what challenges get in our paths!

Happy 12 Year Old

The last two days have been very busy day for me.   I made an Oreo cake, prepared for my Easter activity day lesson, worked on birthday decorations for little sissy's party, made cupcakes for the activity day girls, and went to Marius' movie documentary at BYU last night.  I will blog more later on that amazing event. 


Anyway, as for my oldest daughter's birthday, I made an adorable purse card for my pre-teen and filled it with cash for her to go on a shopping spree.  She is looking forward to spending her money at the mall and savers this weekend.  We also make her a candy bar poster!  I gave her some gummy fast food, ice cream, and some eye shadow and lip gloss.  Since she is getting older, she is getting harder to shop for these days.  She loves make-up, clothes, music, jewellery, lip gloss, etc.  I recall last year she was excited to get a Barbie doll or stuffed animal.  I'm afraid those days of wanting toys are officially over now.  I don't dare to buy her any shirts or jeans without her trying things on because she is getting very picky with the trendy teenager styles.  Grrrr!  Anyway, my brother gave her cash which is definitely a safe birthday present for her since she loves shopping!!  He is a great uncle spoiling her and knows what a pre-teen girl wants!!
Candy Bar Poster


John came up with the wording and I taped it on the poster board....It said the following:  


To our Auddie, Even though life has some SOUR PATCHES, you need to know we love you!  Be TWIX growing older and TRIDENTing to become a teenager.  We hope this year POP ROCKS for you!!!  Happy Birthday Big Sister!!! 12 oh my gosh!  No boys allowed!  7th grade here she comes!


Big Sissy had a great day!  Some of her friends at school gave her some fun birthday gifts (socks, chocolate, and soar patch kids)!


On the doorstep last night, we found a birthday surprise from the 11 year old girl next door neighbor!  Inside the gift bag contained a shirt, orange flip flops, a monkey blanket, Twix candy bar, and a card with $10.00!  Wow, she felt so much love from all the many friends, neighbors, and family members that wished her a happy birthday!  


Purse Cards


Supplies

card-stock paper, digital scrapbook supplies ( I used the Blossom collection by Shabby Princess), scissors, ribbon, foam adhesive (3D Look),  paper flower embellishments, acrylic gems hot glue gun, and glue sticks. 

Directions

Fold the paper in half.  Place the shorter width end of pattern in the middle of the paper near the folded edge. Cut out the pattern with the paper.  Place the purse flap on another piece of paper and cut around it out with the pattern.  You can trace it but my paper was to thick to trace them so I just cut around the patterns carefully.  Next put foam adhesive on the back of the flap and attach it to the bottom of the purse.  As for the flower embellishment, I folded the petals in the middle to add more character to the flower. With the glue gun, glue the acrylic gem in the middle of the flower and use foam adhesive for sticking the flower on the purse. For the purse strap, I used some ribbon which I hot glued neatly inside the folded piece of the card.  Then I tied two smaller ribbons on both sides of the straps on the bottom near the purse.


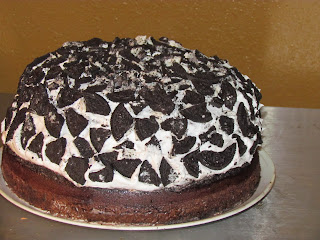
Since my oldest daughter absolutely loves Oreo ice cream, I thought it would be fun to make her a double layered Oreo cake. I was inspired by Shabby Blog's Oreo Cake recipe but I did an easier method. It was delicious!


Oreo Cake


Ingredients:


One devil's Food Cake Cake Mix (18 oz) with pudding (follow directions on box)
Two 8" baking pans (grease with shortening and dust with flour)


Bake at 350 degrees for 33 minutes.  Use a knife around the edges of pan to loosen the cake.  Remove the cake carefully onto a cooling rack.  Allow the cake to cool completely before adding frosting. 


Frosting:


1 package of Oreo cookies (20 cookies) smashed
1 cool whip container


Happy 12th Birthday, Big Sister!


Make a wish, sweetheart and may all your dreams come true!


We love you and cannot imagine our lives without you! XOXOXOX