Pages

Friday, February 25, 2011

Carl Bloch BYU Art Exhibit


 “Christ Healing the Sick at Bethesda" By Carl Bloch


For Activity Day this past week, my co leader and I took the girls to the Carl Bloch Art Exhibit at BYU Museum of Art.  


We printed out our free tickets and parking pass before driving south to Provo.   Carl Block (1834-1890) was a well known Lutheran Danish artist.  Most of his art can be found in Denmark and Sweden mostly in Lutheran churches and castles.  BYU did a magnificent job in displaying his beautiful oil painting and etchings.  I have always been a fan of Carl Bloch's work!  It is probably due to the fact most of his religious works are in the LDS church publications, books, primary materials, etc..   I absolutely loved looking at his etchings.  I felt strong emotions while looking his beautiful etching of Christ.  Maybe someday I will buy a print along with a pretty frame to display on my wall in my bedroom so that He is the first person I see when I wake up in the morning... 


Portrait of Christ


Bloch portrayed many phases of Jesus Christ's life. He had etchings of his birth, healing the sick, raising the dead, His death, resurrection, and so forth.   It was so exciting to see his real oil paintings and etchings on the wall instead of prints.  Some of the paintings were worn and cracked from age still absolutely breath taking.  


 If you live near the Utah area, I highly recommend you go see Carl Bloch: The Master's Hand Art Exhibit!  It will be going until May 7, 2011 and I doubt his works will ever be back like this exhibit!  It was an amazing experience to see his masterpieces that I will never forget!  

Wednesday, February 23, 2011

Happy Hubby= Fabulous Food and Football!


At the beginning of the month, John had to teach a special training for the new employees.  To his surprise, he found out he was picked employee of the month for the month of January!  Way to go, babe!  He received a certificate as well as three gift cards to the following places: Cafe Rio, Chilis, and Maggie Moo's Ice cream!   Yum, we look forward to eating at those amazing places in the near future!


We went to a super bowl party at a friend's house a couple weeks ago.  Hubby and I were in charge of bringing hot wings and mint brownies! So you can imagine how excited my husband was to create delicious spicy hot wings!  We were up until 2:00 AM early Sunday morning frying them.  On Super Bowl Sunday, I wore my green sweater and proudly added a few more drops to the mint brownie's frosting to establish which team I was hoping to win!  The funny thing is the boys were cheering for the Steelers and the girls were Packer fans!  The kids had a blast dancing at half time to The Black Eye Peas!   Below are the recipes that we used to make our amazing Super Bowl goodies!


Chicken Wings
1/2 cup flour
1/4 tsp. paprika
1/4 tsp. cayenne pepper
1/4 tsp salt
10 chicken wings
oil for deep frying

In a small bowl mix together the flour, paprika, cayenne pepper, and salt.  Place chicken wings in a large nonporous glass dish or bowl and sprinkle flour mixture over them until they are evenly coated.  Cover dish or bowl and refrigerate for 60-90 minutes.  Heat oil in a deep fryer to 375 degrees F (190 degrees C).  The oil should be just enough to cover wings entirely, an inch or so deep.  Fry coated wings in hot oil for 10-15 minutes or until parts of the wings turn brown. Remove from heat, place wings in a serving bowl, add hot sauce mixture and stir together.  Serve.  


Sauce
1/4 c butter
1/4 c. hot sauce
1 dash of black pepper
1 dash of garlic pepper


Combine the butter, hot sauce, pepper, and garlic powder in a small sauce pan over low heat.  Stir together and heat until butter is melted and mixture is well blended.  Remove from heat and set aside for later to coat after the wings are fried.


Our thoughts:  This was definitely a tasty recipe with a hint of heat!  We didn't bother putting them in the refrigerator.  We fried the wings from a frozen state and they turned out just fine because we made sure the oil was 375 degrees.  John made a batch with some wings dipped in milk, then coated the wings in the fry batter mixture, and added some honey.  They turned out black, but didn't taste burnt.  We figured the sugars from the honey and milk speed up the browning process while frying.  They had a nice sweet flavor, but I hated the color of them, ack!  So I made sure we had a brown batch, which was accomplished by following the directions.  The wings were great with Hidden Valley Ranch Green Onion Dip and a side dish of some carrots and celery sticks too.  The next day, we put them in the oven at 250 degrees to warm them up.  The recipe is a keeper and we look forward to making them again!


Recipe by Our Best Bites

Brownies:
4 squares unsweetened baking chocolate (4oz)
1 C butter (2 sticks)
4 eggs
2 cups sugar
1 tsp vanilla
1 1/4 C flour
1/2 tsp baking powder

Frosting:
2 C powdered sugar
4 T butter, softened
1 1/2 tsp peppermint extract
1-2 Tbs milk 
green food coloring

Chocolate Glaze:

6 oz (about 1 cup) semi-sweet chocolate chips ,you could also use dark
6 Tbs real butter


Preheat oven to 350 degrees. Line a 9x13 inch pan with foil making sure the foil extends over the edges by at least one inch.  Lightly spray with non-stick spray and set aside.  Chop both unsweetened chocolate and two sticks of butter into chunks and place together in a microwave safe bowl.  Microwave in 30 second intervals, stirring in between, until just melted and smooth.  Set aside to cool, stirring occasionally. With an electric mixer or stand mixer beat eggs, sugar, and vanilla for 2 minutes.  While egg mixture is beating, measure out flour and combine with baking powder.   While mixer is running, slowly add melted chocolate and beat to combine.  Turn beater speed to low and add in flour by spoonfuls.  Mix just until combined.  Pour batter into prepared pan and bake for 20-30 minutes or until a knife poked in center comes out clean.  Cool completely on a metal rack. When brownies have cooled to room temperature, prepare frosting.  Combine all frosting ingredients, starting with 1 1/2 tablespoon of milk, and beat until light and fluffy.  Add more milk by teaspoonful as needed.  Spread frosting evenly over brownies and then place brownies in fridge to chill.   While brownies are chilling prepare chocolate glaze.  Place chocolate chips and 6 tablespoons butter in a microwave safe bowl.  Microwave in 30 second intervals, stirring in between, until just melted and smooth.  Set aside to cool for about 15 minutes and then carefully spread on top of the frosting layer.  Return pan to fridge to cool.  When chocolate has hardened, use edges of foil to remove entire brownie from pan.  Cut into squares and serve.


Our thoughts:  Beware, these are truly amazing brownies that you won't be able to resist!  This is by far, my most favorite mint brownie recipe ever! I've tried many mint brownie recipes too (never found one that I truly liked until now!) They are rich brownies but not terribly sweet due to the semi-sweet chocolate chips and unsweetened chocolate. I loved baking them with the foil method.  Not only was it easy to clean the baking pan, they were so simple to cut into small squares and serve. I ate way too many of these delicious brownies and enjoyed every bite of them!  MMMMMM GOOD!

Tuesday, February 15, 2011

Our Happy Valentine's Day

Over the weekend, the girls were sick with two different types of flu.  One girl had the body aches and fever while the other girl had vomiting, diarrhea, and fever.  We missed church because we didn't want to share our yucky germs!  Luckily, on Monday morning, they were well enough to go back to school.   Who would want to miss school on Valentine's Day?  Both girls had class parties.  Little sister went on a field trip to a rest home to sing a couple songs to the elderly.  They were so happy to come home and show me their Valentines from their classmates!


For the girl's teachers and my visiting teaching sisters, I made adorable gift wrapped containers filled with chocolate from recycled toilet paper rolls.  I got the idea from  Dani's Blog . They are so easy and fun to make!  I was very happy with how they turned out!  The girls were excited to give their Dove chocolate Valentine to their teachers!


Valentine Gift Roll

Supplies:

toilet paper roll
ribbon
tissue wrapping
scrapbook paper (I used Wild Love kit by Shabby Princess)
candy heart chocolates or any candy will do
tape, scissors, and glue stick (for the paper heart embellishments).


Step One: Roll the toilet roll in tissue paper.


Step Two: Tie the end with ribbon, add candy to the container, and tie off the other end with ribbon.


Step Three: Wrap the pretty scrapbook paper around the toilet roll and add some cute embellishments.

After the girls left for school, I put on my dusty running shoes and went on a long walk with John since it was his day off from work.  We walked up and down the foothills near our neighborhood.  It was a beautiful morning!  The sun was out for a while and wasn't too cold.  Later that day it got dark and gloomy.  I'm so glad we got out and took advantage of the great sunlight because I've been lacking some vitamin D treatments from the sun lately.  Today we both have extremely sore legs, hips, and behinds! OUCH!  What a workout!


For my Valentine Day present, John  surprised me with some beautiful hyacinth flowers since I am not a rose kind of girl.  Trust me, I've had many dozens of roses in the past, but personally I think they are a generic Valentine's Day gift.  Over the years, he has given me different flower arrangements with many other types of flowers than just roses.  Anyway, he had his reasons why he felt he had to buy me two flowers instead of one.  The pink one represents my good days and the violet symbolizes my dark days.  He informed me that he loves me no matter what kind of mood I'm in (thank goodness, right)!  So sweet of him and I feel so loved! ♥  They smell so good and remind me of Spring time when lilacs bloom.  I have spring fever and cannot wait for winter to be over!!! The flowers brighten up any room in the house!  I love the fact that these flowers could be houseplants or planted outdoors in a garden.  Whereas, roses die after a couple weeks.  So hopefully I will remember to water them enough and they will last for a while! 


Later that day for lunch, John spoiled me with a grilled chicken salad from Cafe Rio, yum!  


Then for dinner, he made us homemade Italian meat balls, pasta with red sauce, salad, French Bread, and bought some bubbly sparkle non-alcoholic pomegranate apple juice and grape juice.  It was a wonderful relaxing Valentine's Day since we exercised our hearts together and enjoyed some healthy food! ♥♥♥♥♥

Friday, February 11, 2011

"Love" Activity Day Crafts and Chocolate Rice Krispy Hearts

It was my turn to do activity day this week.  I decided since we are celebrating Valentine's Day on Monday, we should do some fun crafts and eat an amazing heart dipped chocolate sweet!  It took me a couple days to prepare for my activity. Thankfully, I got some help from my hubby, nephew Justin, and Justin's girlfriend Kelli to help me prep for my activity on Tuesday.  I tend to have a problem of thinking 'big' on my ideas and kick myself later when I find out how much work needs to be done to accomplish the things, doh!   


First of all, we made the YUMMY Valentine's Day themed treats.  I thought about the girls decorating sugar cookies, but felt bored with that idea.  Instead, I came up with a great idea of chocolate dipped rice krispy treats!  It turned out way better than I thought it would! Yay!  So you wanna know how I made them?  Here is the recipe below...


Chocolate Dipped Heart Rice Krispy Treats

6 cups of rice krispies
4 T( 1/4 c)  butter
1 bag of miniature marshmallows
heart shaped cookie cutter
cake sprinkles
sucker sticks or popsicle sticks
butter cooking spray
wax paper


Melt butter and marshmallows in a large pan.  Add rice krispy cereal and stir together well.  They will be gooey rice krispies, which is the only way to eat them in our household.  Remove from heat spray cooking spray on your clean hands.  Make sure you have another person helping you make these treats because the cereal mixture cools quickly and will be hard to mold while doing it alone!  Spoonful the krispy treat into the heart cookie cutter on wax paper.  Remove the cookie cutter and add the stick.  Gently place the stick in the heart shaped krispy mixture and add a spoonful on top of the stick gently molding it together pressing lightly.  Allow them to cool for a few minutes.  Once they are solid and secure on the stick start dipping them into chocolate. 


Melted Chocolate 

1 cup of chocolate chips (semi-sweet)
4 T. of butter
2-3 T of milk

Cut the butter into tiny pieces.  Add chocolate chips and butter in a microwave safe bowl.  Heat 30 seconds and stir.  Repeat heat and stir steps until the chocolate is completely melted.
Add milk and stir well.  We found that adding some milk will stretch out the mixture and will be easier to dip/ brush onto the krispy treats.  We used a pastry brush to coat the chocolate on the heart shaped krispy treats.  Then added some sprinkles and set them on wax paper to cool. We kept these treats in the refrigerator to make sure the chocolate stayed solid.  They were so gooooood!  We would like to try different variations such as using other holiday molds for Easter, Halloween, Christmas, St. Patrick's Day, etc.

As for my first craft, I made some adorable heart rings as a gift from me for my activity day girls.  They were a total hit!  The girl's absolutely loved them and cannot wait to wear them to school on Valentine's Day!  In fact, my youngest daughter wore them to school the next day! They were pretty simple to make for me considering that I am an inexperienced sewer! This project took me a couple hours of tracing, cutting, painting, and stitching the cute homemade Valentine's rings.   I got this lovely idea from Red Bird Crafts.


Felt and Button Heart Rings


 Wooden Heart Rings


Heart Rings

Thread red, pink, white from Walmart
Paint red and pink
Wood hearts (I got them at Robert's Craft)
Felt red, pink, and white from Walmart
1/4" flat elastic (black or white)
heart shaped buttons (red, pink, and white)
Other supplies: drill, scissors, needle, and a heart shaped stencil.

I measured my girl's fingers with the elastic (cutting them out larger than what I measured so I could sew the piece together by hand).   Since I bought white elastic, I used either red or pink thread to sew it together.  For the wooden hearts, drill two small holes (like button holes for stitching), then paint the hearts red or pink.  Once the wooden hearts are dry sew the wooden heart with some thread like you were sewing a button onto the felt elastic.  As for the felt heart rings, I traced a couple different sizes of hearts using a stencil (you can easily draw your own heart patterns by hand).   I traced the hearts on the felt material and cut them out with scissors.  You can design them however you like using one heart with a button or doing a couple different shaped hearts as well as the button.   Sew them all together on the elastic.  


During activity day, the girls and I made some homemade thumb print "love bugs" Valentine's Day cards, which I got this idea from Sweet and Lovely Crafts.


Thumb Print Love Bugs Card

red paint
black marker or pen
 googly eyes
card-stock paper (red, white, and black)
ribbon (red or polka dot like a lady bug)
Other supplies: paper hole punch, glue, scissors, and thread.

Directions for the heart card:  Do the child's thumb print first so that it will have time to dry.  I liked using white paper for the thumb prints.  Next, trace three hearts using a heart stencil or draw a heart pattern.  I used three different colored papers.  Use the hole punch on the top of the heart.  Cut some ribbon and tie a lovely bow through the three hearts.  When the painted thumb print is dry, glue some googly eyes on, draw a mouth, nose, bug legs, etc or draw the "love bug" however your heart desires!  On the back or front of the red and white heart papers is where the kids could write a little Happy Valentine's day or love note! 


These are my cards, which I created using my daughter's thumb prints!


The activity day girls free styled their cards using hearts and scrap pieces of papers.  Here are some examples of what my girls did.  Sooo cute, eh?  They had a lot of fun making them!


Thursday, February 10, 2011

My Crafty Child

Apparently creativity is a strong gene in my family.  Last week my oldest daughter decided to make a small pink hair clip and a couple bookmarks. The next day she gave the flower hair clip and one bookmark to her teacher, Mrs. Day.  As for the other two bookmarks, she gave them to her friends in her class.  She expressed to me how much she loves making crafts for other people!  I was quite impressed with her designs and happy that she enjoys making things!  Way to go, girlie!

Pink Flower Hair Clip

She picked out the pink scraps (left overs from other flower projects) and I glued it together since she didn't want to burn herself with the hot glue gun!


She wanted to model the new pink flower hair clip! So pretty,eh?


Funky Paisley Bookmarks

We used paper flowers, gems, blue ribbon, and I printed out some digital scrapbook paper "Splendid" by Shabby Princess.  We used the glue gun to stick the scrap papers and embellishments on the bookmarks!


She was so excited to to give them away the next day!


On Tuesday February 8, the six graders were assigned to present a science fair project for the invention convention.  She had to come up with a creative idea, that hasn't been made before that could be useful.  Since we love to play board games in our household, she made the game organizer!

The Game Organizer


Supplies:

a cardboard box
 a sharp tool to cut out the pieces
 duck tape
 scrapbook papers
 glue gun and lots of glue sticks
 scissors
modge podge
paint and paint brushes

Directions: The box had the following dimensions: 10 3/4" X 13" and the four corners were 2 1/4".   There were three different sizes of dividers, which we cut out four of each size. Large-3 5/8" X 1 1/4", Medium- 3 1/2" X 1 1/4" and Small- 2" X 4 1/4".  We duck taped the box pieces together, painted the inside of the box blue, and applied modge podge over the outside and inside with digital scrapbook papers.  We applied scrapbook paper on the dividers with the glue gun (folding the paper around the cardboard pieces).  Next, we hot glued the orange strips of paper on the edges of the box and glued the dividers inside the boxes.


Explanation:  The game organizer holds eight money slots and space for other game pieces.  You could also roll the dice in the empty space, which would reduce the problem of the dice rolling off the table!  

Purpose:  Are you tired of scattered paper money and games pieces all over the place while playing board games?   The game organizer makes it easier for the players to keep track of their money and other game pieces.


Little Sis playing the Game of Life
 without the Game Organizer!


The game cards and pieces using the Game Organizer!


A close up of the poster at school.


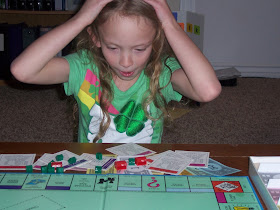
Little sissy playing Monopoly
 without it.


Has she convinced you that you need one of these while playing board games?   There were several parents that made the comment, "I would buy the game organizer!"


Big Sis did an incredible job on her project and worked very hard on it!  John cut the pieces out with a sharp knife tool thingamajig and I hot glued the small pieces together. It was a good thing she didn't do the gluing because I got a second degree burn from the glue gun!  Duh! She duck taped the box together, applied the pretty paper "Splendid" by Shabby Princess, and designed her poster.  There are some talented kids at her school!  I was very impressed with all the six graders science projects! I'm so glad this project is done, out of the way!  The next big school project for big Sissy is a country report on Japan in April.  Hopefully, she is working hard on it during class and we won't be stressing at the last minute to get it done!  

Wednesday, February 09, 2011

Lovely Valentine Themed Scraps


Since Valentine's Day is approaching soon, I thought I would share some of my favorite Valentine Day's themed scrapbook layouts.  I absolutely love Shabby Princess digital scrapbook kits, embellishments, fonts, etc!  I've been slowly collecting her beautiful digital kits over the years.  When Wild Love first came out, I got busy doing a couple "lovely" layouts.

Wild Love Kit by Shabby Princess
Here are my lovely layouts that I created using this kit!
Wild Things, 2004

Wild things you make my heart sing! I always get the lyrics of that song in my head so I decided to scrap a page that fits the words, LOL!  Credits: template by MSraps, every thing else is from Shabby Princess and unknown font.

Be mine, I love you, 2006
John and Jen: Be mine, I love you XOXOX
Credits: Shabby Princess, doodle by Lynnie Smith and unknown font.
You are Special, 2006
This is my youngest daughter. The journal notes says: Kids on the Move Playgroup.  You entered the world four weeks early.  You were delayed in speech and motor skills.  Carolyn and Caleb were your special team who helped you master speech, fine motor skills, and gross motor skills.  Thank you Kids on the Move.

Credits:The torn paper template is by Dorothy Howell. Everything else is by Shabby Princess (Wild Love Kit, Faux Jewels Embellishment Pack, Splendid Kit, and Autumn Chic Kit). The font is Susi's Hand.


*When I get a better working computer, I will be able to look up my unknown fonts that I used in my scrapbook pages!


Friday, February 04, 2011

Ice Cream Cookie Sandwiches

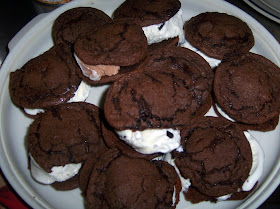
I love this simple cake mix cookie recipe.  It is definitely kid friendly!  My kids had a lot of fun making homemade ice cream sandwiches! I got this recipe idea from  Cake Mix Cookies @ Our Best Bites.  I altered the recipe by adding another egg.  For whatever reason, the dough was too dry for me.  The cookie batter was better for me with three eggs instead of two.  So try it out with two eggs first to see how the dough reacts then add another egg if you need to. :D  This would be a fun and easy Family Home Evening treat!


Ice Cream Cookie Sandwiches

1 chocolate cake mix
1/2 cup shortening
2-3 eggs
Your favorite ice cream

Yield 15-20 ice cream sandwiches (depending on how small you roll your cookie dough).

Preheat oven 350 degrees.  In a large bowl, combine cake mix, shortening, and eggs.  Mix well (will be stiff). Then roll the dough into small balls and drop onto a baking sheet.  Bake for 5-7 minutes.  Allow them to cool on the baking sheet DO NOT PUT THEM ON WIRE RACK to cool.  The cookie will fall through the cracks or fall apart (trust me on this because I made the mistake)! You could place the cookie sheet in the freezer to speed up the cooling process.  Once the cookies are cool on the flat surface of the cookie add a spoonful of your favorite ice cream and add another cookie on top of the ice cream gently smashing them together.  We had the following ice creams: chocolate, vanilla, and chocolate chip mint.  I am sure it would be great with neapolitan, strawberry, or any ice cream!  You may eat them right away or freeze them for later.  They are great the next day!  Yum and enjoy!

Thursday, February 03, 2011

My Daughter's Shutterfly Book

Several months ago, I got a coupon in my email for a FREE that is right a free 8X8 Shutterfly book (paid for shipping only).  I totally recommend that you sign up to be on their mailing list.  Shutterfly always has some coupons or sales going on.  Sometimes they offer free photo prints (just pay for the cost of shipping).  In fact, today in my email from Shutterfly I got a 50 free prints promo code!  Anyway, you can imagine how happy I was to see a free photo book offer and I could not resist it!  It was very easy to create my book on their site using their format.  There are several layout options with different templates to design a page.  I just clicked on a layout and plopped the photos on the page. I also added some text too.  It was not complicated at all!  I was very impressed with Shutterfly (service and printing quality)! I ABSOLUTELY LOVE my book and the girls love looking at it too!  My youngest daughter likes to read it like a storybook!  I decided to make the book about Sisterhood and included  a couple of my favorite sister quotes and cute descriptions of the photos.  Here are a couple of my favorite pages, that I would like to share with you on my blog!
                        
Sisterhood Established 2003


SISTERS FOREVER 
Always my sister, always my friend.
  "A sister is a little bit of childhood 
that can never be lost." 
-- Marion C. Garretty


 Too cute to spook!
Sugar, spice and 
everything sassy!  
Wild things you 
make my heart sing!


Pretty in pink 
"Little girls are 
precious gifts,
wrapped in love 
serene, their 
dresses tied 
with sashes
 and futures tied
 with dreams."
--Author Unknown

 I couldn't ask 
for a better sister!


  Monkeying around 
  in monkey pajamas!
 Forever in blue jeans! 
 Girls got style!


Bubbles bubbles everywhere and stepping up to fashion!


Girls are giggles 
 with freckles
 all over them.


"An older sister is a friend
 and defender-a listener,  
conspirator, a counselor, 
and  sharer of delights
And sorrows too."
---Pam Brown


On the other pages not shown,  they say the following: 

I would be lost 
without my sister!

I'm glad God chose
 you to be my sister!

  Thank Heaven
 for little girls! 

Sisters by chance,
friends by choice.

Caution kids at play!
A sister is the best 
play date in the park!

 Sisterhood established April 15, 2003.